 on 5 September 2026
 DoliPlus Bidirectional Communication API
DoliPlus’s bidirectional communication API
The DoliPlus bidirectional communication API enables machine-to-machine dialogue: your software talks to itself, and nobody types the same data twice. In practice, it connects your ERP to your other information systems and opens up:
- reading your data from another application: companies, contacts, quotes, orders, invoices, products, contracts;
- writing into DoliPlus: create a customer, post an order, update a price without going through the screen;
- visit reports, which this same channel can now read and feed (new in September 2026);
- your custom fields, which travel along with the object they belong to;
- outgoing notifications that alert your other software as soon as an event occurs, so it never has to poll DoliPlus;
- real-time tracking of your prices and invoices: a price change or a validated invoice is sent straight to your other software (new in September 2026).
To do this, it relies on two components. First, a REST API. Then a webhook. Therefore your ERP stops being an island: it becomes the single source of truth your other tools synchronise with.
This feature is currently under development. Its use requires advanced skills and a good knowledge of DoliPlus.
Using the REST API
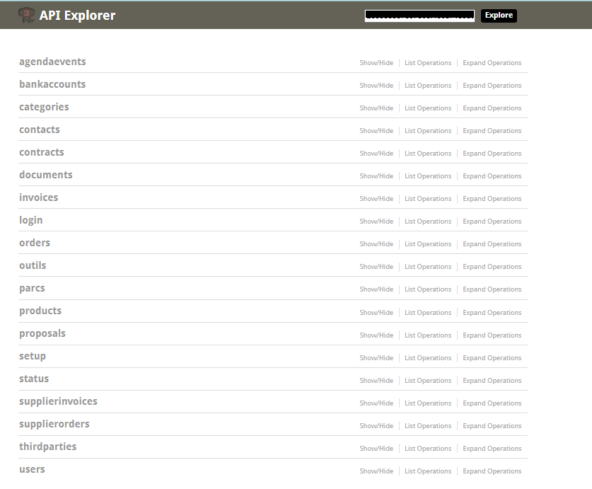
First, a Swagger-style interface lists most of the possible communications via the API (Application Program Interface).
Furthermore, this feature is available upon special request. As such, it can be subject to checks and improvements before going live, according to your needs and on a quote.
In practice, once the module is activated, DoliPlus also becomes a REST web service server.
You can therefore send your own REST request. To do this, target the relative URL /api/index.php/xxx, where xxx designates the name of the API to call.
Moreover, the list of APIs in your installation remains available via the API explorer.
Thus, you can see the complete list of DoliPlus web services provided. To get started, call the explorer at the following address:
http://yourdolibarrurl/api/index.php/explorer
For example, you can also try the explorer on the demo instance:
https://demo.dolibarr.org/api/index.php/explorer
Then, in the top right corner, paste the <token> (API token) of the desired user. Then click the “Explore” button.
Note: each user’s token is defined on the user registration page.
After clicking “Explore”, you should see all the available actions with this token. If you see few, it’s likely that the corresponding modules remain deactivated.
For example, to view invoices, first activate the invoicing module in DoliPlus settings. The same applies to products, customers or suppliers, and so on.
On this exploration page, you can therefore run quite a few tests. Indeed, you read DoliPlus data, but also write, modify, and delete it.
Beware, however: the data is actually modified in your database.
Then, you can test any API directly from the explorer. This is actually the recommended solution, as all APIs and parameters are documented there.
Consequently, after each test, you get the response. Moreover, you receive an example of how to call the API.
To use the REST API, you must finally call a URL such as this one:
https://<my_server>/api/index.php/<action>
Use one of the following 4 methods: GET, POST, PUT, DELETE. Then replace <action> with the desired action. Ex:
https://<my_server>/api/index.php/invoices
Code examples
There are different ways to proceed. Here is an example code snippet. However, you can also use other libraries.
function REST API  callAPI ( $method ,  $apikey ,  $url ,  $data  =  false )
{
    $curl  =  curl_init ();
    $httpheader  =  [ 'DOLAPIKEY : ' . $apikey ] ;

    switch  ( $method )
    {
        case  "POST" :
            curl_setopt ( $curl ,  CURLOPT_POST ,  1 );
            $httpheader []  =  "Content-Type:application/json" ;

            if  ( $data )
                curl_setopt ( $curl ,  CURLOPT_POSTFIELDS ,  $data );

            break ;
        case  "PUT" :

	    curl_setopt ( $curl ,  CURLOPT_CUSTOMREQUEST ,  'PUT' );
            $httpheader []  =  "Content-Type:application/json" ;

            if  ( $data )
                curl_setopt ( $curl ,  CURLOPT_POSTFIELDS ,  $data );

            break ;
        default :
            if  ( $data )
                $url  =  sprintf ( "%s?%s" ,  $url ,  http_build_query ( $data ));
    }

    // Optional authentication:
    // curl_setopt($curl, CURLOPT_HTTPAUTH, CURLAUTH_BASIC);
    // curl_setopt($curl, CURLOPT_USERPWD, "username:password");

    curl_setopt ( $curl ,  CURLOPT_URL ,  $url );
    curl_setopt ( $curl ,  CURLOPT_RETURNTRANSFER ,  1 );
    curl_setopt ( $curl ,  CURLOPT_HTTPHEADER ,  $httpheader );

    $result  =  curl_exec ( $curl );

    curl_close ( $curl );

    return  $result ;
}
This is just a working example. Note that there is no error handling and security has not been considered. However, you can use this code and then modify it as needed.
Additionally, the function takes 4 parameters:
- $method: string, “GET”, “POST”, “PUT”, “DELETE”
- $apikey: string, “your <token> generated earlier”
- $url: string, URL to call. Example: “http://<your_server>/api/index.php/invoices”
- $data: string, data in JSON format. Also, this parameter is optional.
Javascript Ajax
< script >
$ . ajax ({
  type :  'GET' ,
  async :  true ,
  contentType :  "application/json; charset=utf-8" ,
  data :  {  'lang' :  'en_US'  },
  dataType :  "json" ,
  cache :  false ,
  jsonp :  false ,
  headers :  {
    'DOLAPIKEY' :  'abcdef123456'
  },
  url :  'https://myserver/api/index.,
success :  function ( rep )  {
    console . log ( "API call successful" );
    console . log ( rep );
  },
  error :  function ( rep )  {
    console . log ( "API call error" );
    console . log ( rep );
  }
});
< /script>
Retrieve table fields
Let’s take the products table as an example.
First, the simplest way to get its fields is to list one or more products using a GET request.
Alternatively, you can go to the configuration console. A link there allows you to explore tables, provided you have administrator rights.
However, some fields are renamed during transactions. For example, rowid may become id, or socid for a customer or supplier. Therefore, this method is not reliable for making injections.
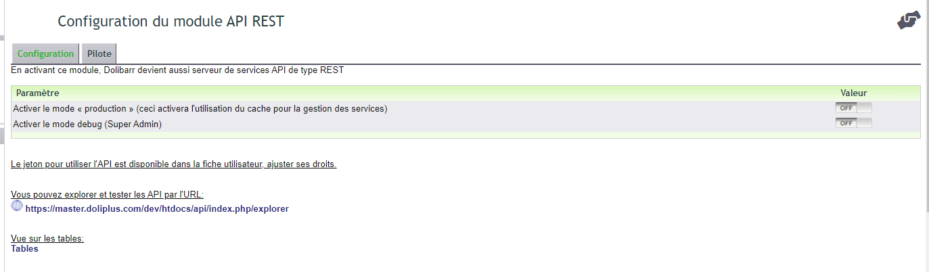
Extract from the products table
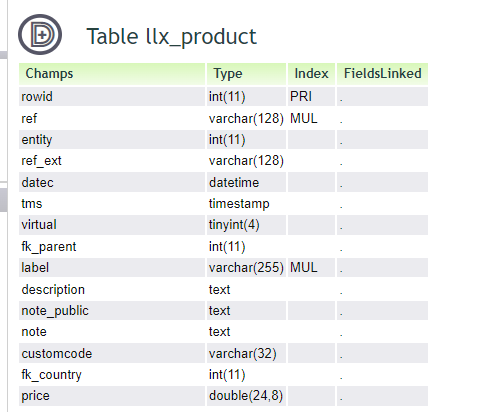
Example – List contact(s)
Example – Create a contact
Before creating a contact, it may be wise to check if it already exists. Additionally, this allows you to obtain the field structure.
In practice, the relevant table is llx_socpeople for the fields. Note: we use socid instead of fk_soc for the customer or supplier ID.
Here is the POST request:
curl -X POST --header 'Content-Type: application/json' --header 'Accept: application/json' --header 'DOLAPIKEY: XXXXX571e9accee5df' -d '
{
"socid": 1 ,
"entity": "1" ,
"civilite": "MR" ,
"name": "TEST" ,
"firstname": "TEST2" ,
"address": "12 rue de fleurs" ,
"cp": "75010" ,
"ville": "PARIS" ,
"poste": "Director" ,
"phone_pro": "0413054367" ,
"phone_perso": "0425363212" ,
"phone_mobile": "0606060504" ,
"email": "test@gmail.com" ,
"fk_user_creat": "1" ,
"note": "EE" ,
"note_public": "ZZ" ,
"import_key": "API" ,
"statut": "1"
}
' 'https://xxxx.doliplus.com/dev/htdocs/api/index.php/contacts'
These are the fields to inject in the interface for testing. Then, adapt them to your data.
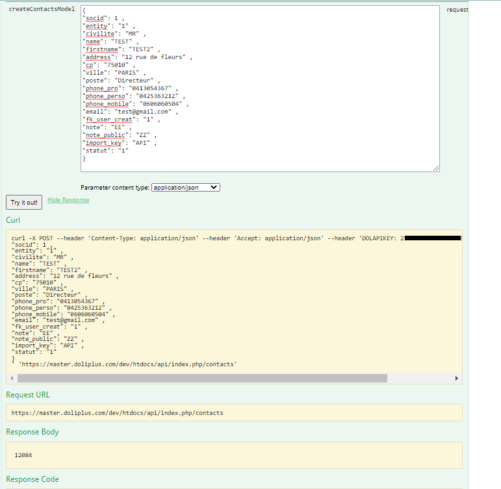
In this example, the created ID is 12084.
Note:
Contact types: type

Example – Create/modify a contact’s custom fields
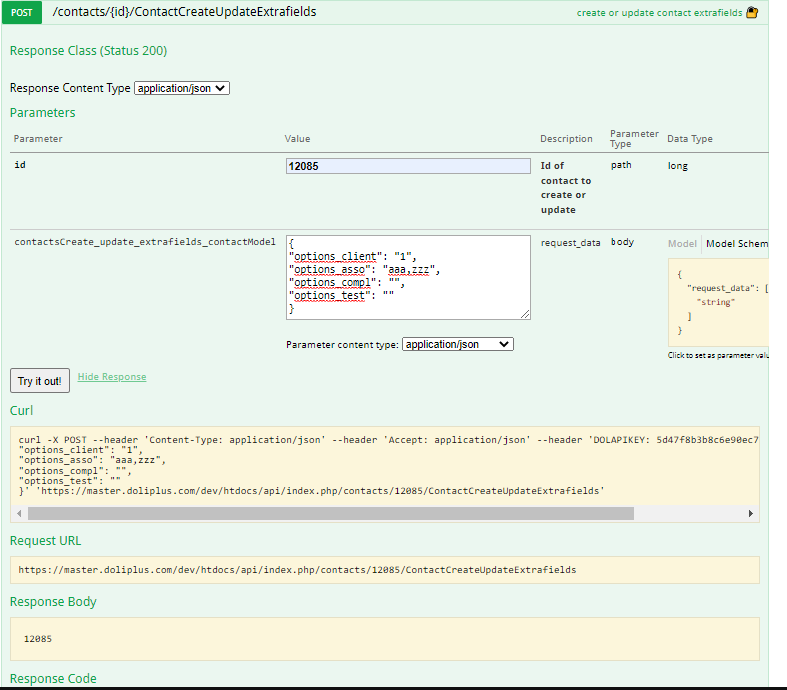
Finally, the fields use the same syntax as when extracting them. Thus, they have the prefix options_: “options_xxxxxx”
{
"options_client": "1",
"options_asso": "aaa,zzz",
"options_compl": "",
"options_test": ""
}
You just need to insert the values.
Example – Modify a contact
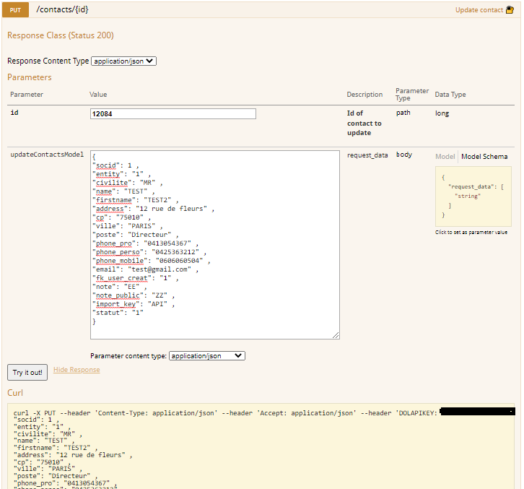
Let’s revisit the previous example with ID 20084. This time, use the PUT request on the URL: https://xxxx.doliplus.com/dev/htdocs/api/index.php/contacts/12084
Example – Delete a contact
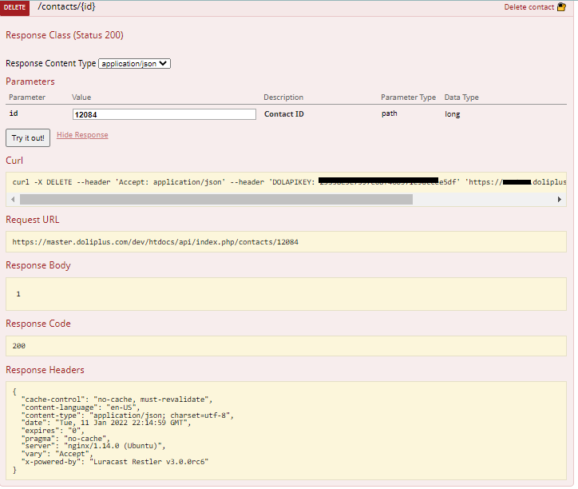
Let’s revisit the previous example with ID 20084. This time, use the DELETE request.
curl -X DELETE --header 'Accept: application/json' --header 'DOLAPIKEY: xxxxx0571e9accee5df' 'https://xxxx.doliplus.com/dev/htdocs/api/index.php/contacts/12084'
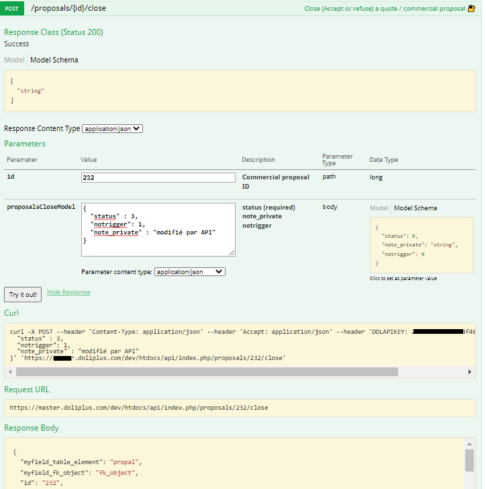
Example – Change a proposal’s status
Here are the parameters to send:
“status” : 2 (accepted) or 3 (rejected) ,
“notrigger”: 1 – do not trigger other events ,
“note_private” : “modified by API”
}
Example – Calling a product list
First, the accepted parameters are partly documented in the REST explorer.
Next, you have SQL filters. These are sent to the database after verification. For example, they work on the product endpoint:
(t.fk_product_type: = :’0′) and (t.tosell: = :’1′) and (t.label: ilike :’%string’)
Finally, for dates, the ISO format is accepted: %Y-%m-%d, for example 2020-07-14. However, the ddmmyy format is not accepted.
Example – Calling a job dictionary for customers or suppliers
First, the available dictionaries are listed in the SETUP section. Here, we use GET /setup/dictionary/jobs.
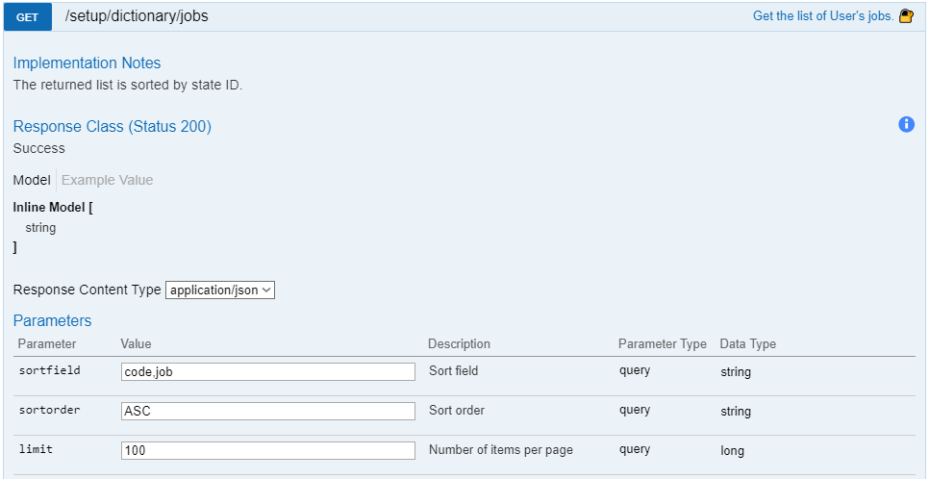
Here’s an example output sorted by code and job:
[ { “code”: “BE”, “job”: “Draughtsman / Quantity Surveyor / Design Office Engineer” }, { “code”: “COMPTA”, “job”: “Accounting / Invoice Settlement” }, { “code”: “CONCPT”, “job”: “Designer / Salesperson / Business Developer” }, { “code”: “CRAYON”, “job”: “Kitchen Department Manager” },……..]
Example – Calling a customer price list
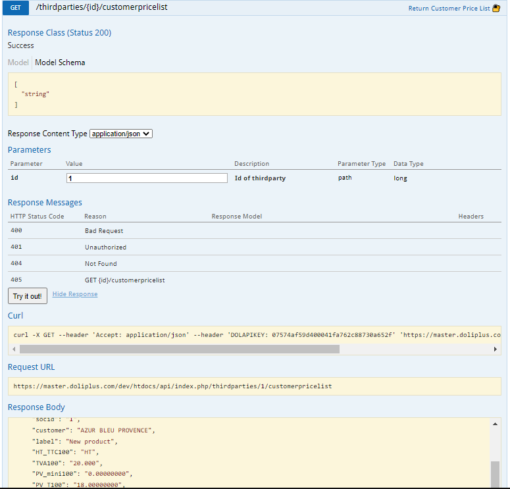
This call corresponds to statistical query 507.
Example – Calling customers or suppliers in a category
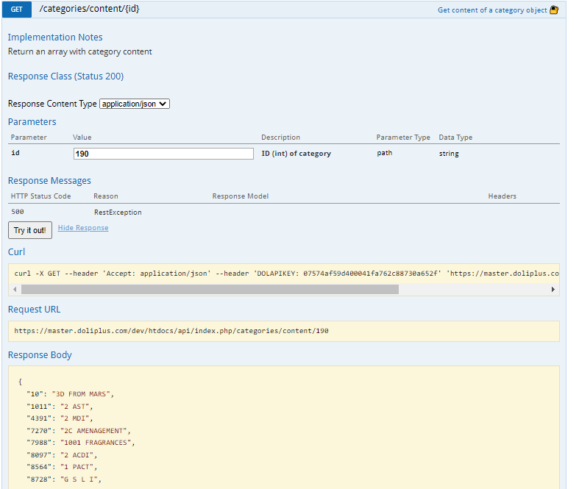
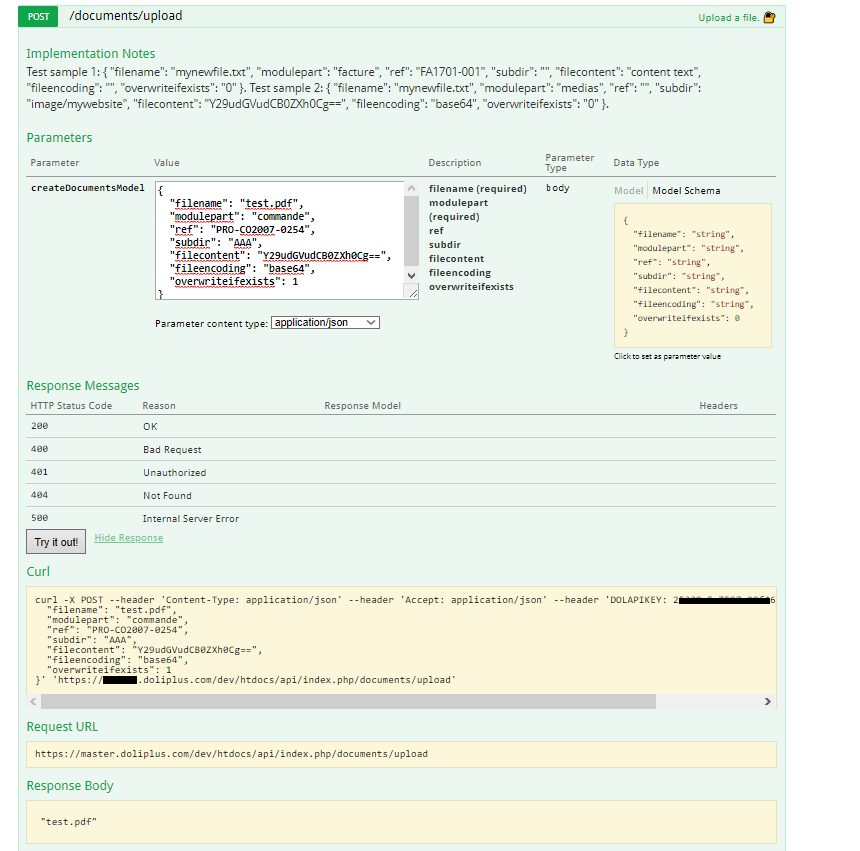
Example – Sending a document
For example, to the document library of an order with ref PRO-CO2007-0254.
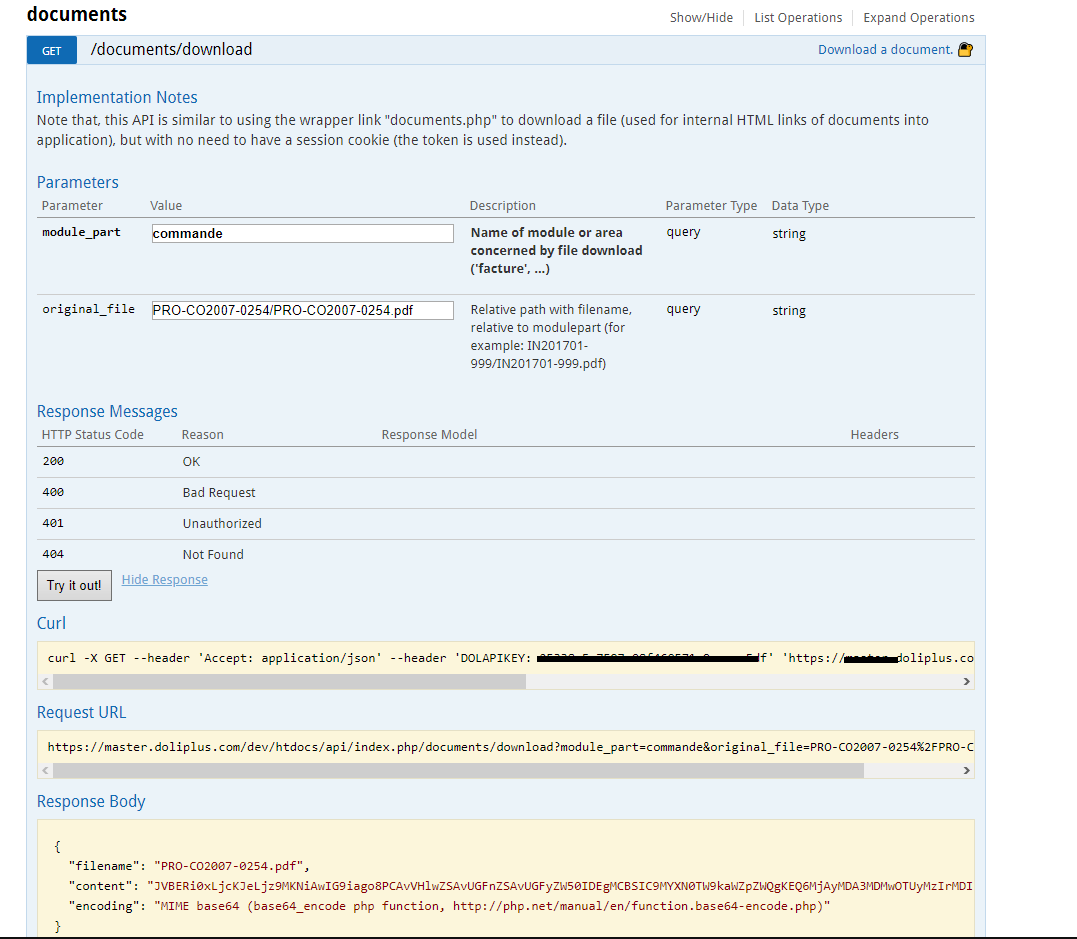
Example – Downloading a document
For example, for a customer order with ref PRO-CO2007-0254.pdf.
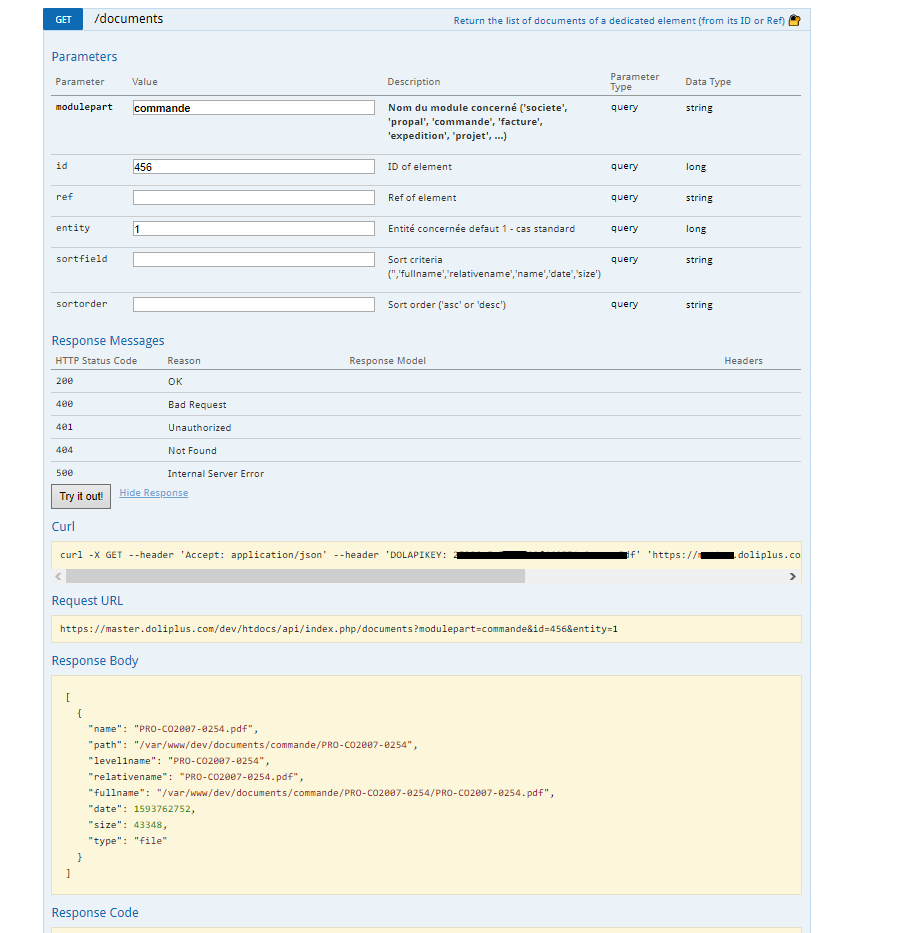
Example – Listing documents
For example, for a given customer order with ID 456.
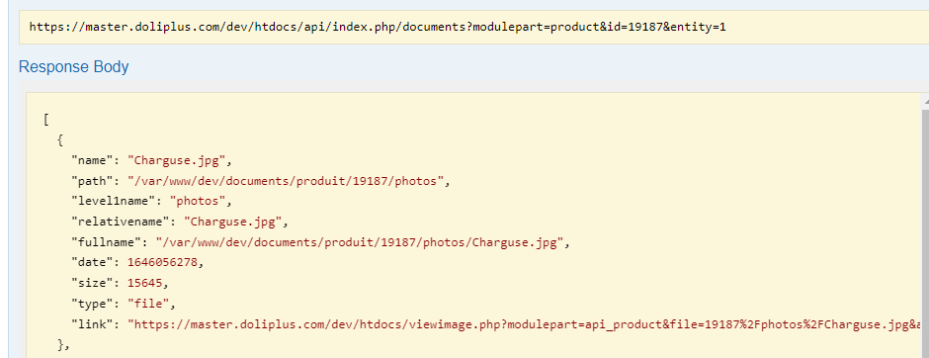
Example – Listing product images
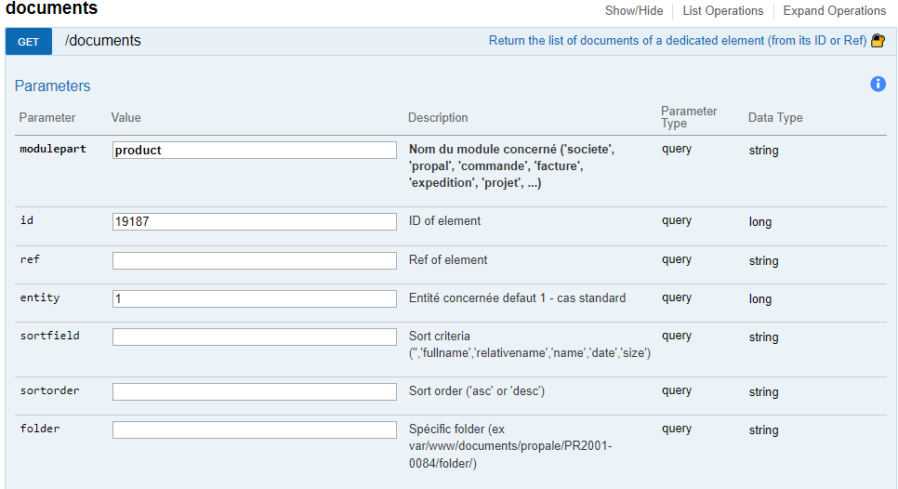
Additionally, a public “link” is included in the response. This allows you to access product photos.
Example – Listing customer managers by rank
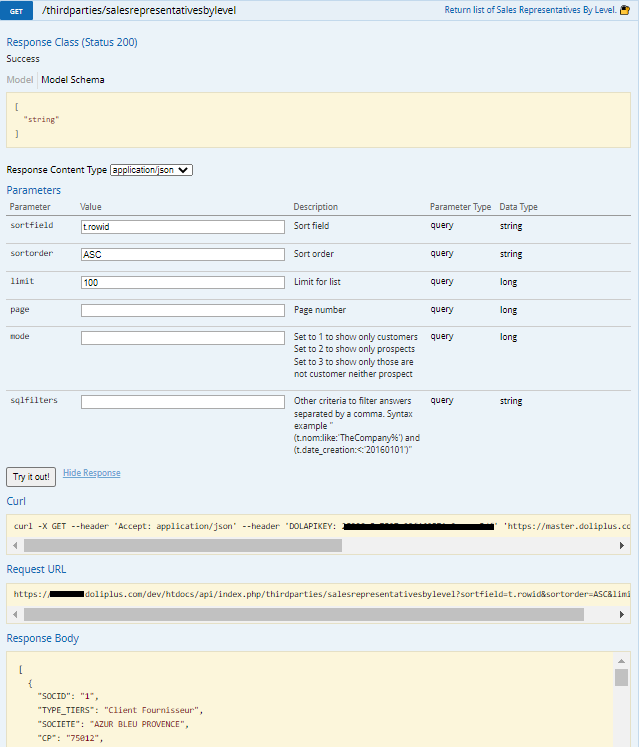
You can also add a filter by customer ID.

Setting up advanced data via Webhook events
To put it simply, webhooks trigger an action after an event. They’re typically used to enable communication between systems.
In practical terms, it’s the simplest way to receive an alert. The notification triggers as soon as something happens in another system.
In other words, a webhook is an HTTPS callback to a user’s specific URL. It enables real-time notifications, keeping your system updated the moment an event occurs.
By contrast, a standard API requires continuous polling. Webhooks proactively notify you when information arrives, making them an efficient way to receive updates without constant checks.
Each notification is sent to the address set in the API module settings. It carries the object’s identifier and its state: create, update or delete. When it arrives, your software queries the REST API to read the object’s details.
Here are the events sent today.
event – send_order (orders)
A notification is sent when an order is validated (create), on every change (update) and when it is deleted (delete). Changing one of the order’s custom fields also counts as a change.
[“id” => order Id,
“state” => create / update / delete
]
event – send_invoice (invoices)
A notification is sent when an invoice is validated (create), then on every change, payment, return to unpaid or cancellation (update), and when it is deleted (delete). Drafts are not sent: your software only receives real invoices. Changing one of the invoice’s custom fields also counts as a change.
[“id” => invoice Id,
“state” => create / update / delete
]
event – send_products (products and prices)
A notification is sent when a product is created, changed or deleted. It is also sent when its selling price changes, and when a supplier price is added, changed or removed. In those last two cases, the “change” field tells you what moved.
[“id” => product Id,
“state” => create / update / delete,
“change” => price (selling price) / buyprice (supplier prices) — only on a price change
]
Your software can therefore update the prices of that one product, at the moment they change. There is no need to re-read your whole catalogue every night.
event – send_tiers, send_contacts, send_categories
In the same way, a notification is sent when a company, a contact or a category is created, changed or deleted. For companies and contacts, the notification carries their details directly.
event – send_documents
Finally, when a document is added to or removed from the DoliPlus document management attached to an open order, a notification is sent to the configured address.
[“id” => order Id,
“element” => commande,
“state” => add / delete,
“file” => file path
]
When it receives this event, your software uses the API to fetch the documents added to the order.
What does not trigger a notification
A bulk import (CSV file of products or purchase prices) writes straight into the database, without going through these events. After an import, plan a one-off synchronisation on your side.
Your prices and invoices, tracked in real time
Do you connect DoliPlus to planning, production or shop software? Since September 2026, that software learns straight away what changes in your prices and your invoicing:
- a changed selling price or supplier price is sent immediately, product by product;
- every invoice validated, paid or changed is reported, just like orders already were;
- the custom fields of your orders and invoices are tracked on every change.
The benefit is twofold. First, your other software always works with up-to-date prices. Second, it can drop full catalogue re-reads, often scheduled at night, which load your server for nothing.
Visit reports now travel through the API too
Until now, the reports written on a customer record lived inside DoliPlus only. Since September 2026, the DoliPlus bidirectional communication API exposes them just like quotes or invoices.
In practice, a third-party application can now:
- list the reports of one specific customer, from the most recent to the oldest;
- read a report, with its date, its type, its content and the people invited;
- create one, for example at the end of a meeting recorded elsewhere;
- correct or complete an existing report;
- fill in the custom fields you added to your reports.
Two uses come up often. First, the scheduling tool of a field team: the visit is recorded on the sales representative’s phone, and the report lands on the customer record without a second entry. Then, an external dashboard that wants to show the latest exchange with each customer.
Internal data that stays internal
A visit report holds what your teams tell each other about a case. Therefore this part of the API answers your employees’ accounts only. In contrast, an account attached to a customer — an extranet login, for instance — never reaches it, even with a valid key.
Moreover, everyone’s permissions keep applying exactly as they do on screen. So a person allowed to see only their own reports will see only theirs through the API. The same goes for editing and deleting.
Next steps
- Connecting your software systems: no duplicate entry or coding required – link your software systems without duplicate entry or development.
- The visit report – what a visit report is for, and how to write one day to day.
- Visit reports: entry screen and read receipts – on-screen entry and read tracking for the people invited.
- Custom fields: edit them in one click – add your own fields, which the API then carries along with the object.
