 on 2 September 2026
DoliPlus lets you export accounting entries to your accounting software in a few clicks. Your bookkeeper therefore receives data ready to import, with no re-keying.
In practice, you set up your accounting codes once, then export your journals in the expected format. Moreover, a safeguard prevents any change to an invoice that has already been exported.
DoliPlus is the enhanced cloud edition of Dolibarr, and this feature belongs to its advanced accounting module.
Export accounting entries to your accounting software
You export accounting entries journal by journal. You therefore transfer the entries of:
- sales;
- purchases;
- bank;
- cash account;
- third-party accounts.
Once exported, the entries feed the general ledger. Moreover, the transferred invoice locks itself automatically, which keeps your records consistent with your accounts.
The available export formats
You pick the format used to export accounting entries straight from the module settings. DoliPlus offers, among others:
- the Standard format (CSV, separator of your choice);
- Cegid Expert for the sales and purchase journals;
- Quadratus (Quadra Compta);
- Ciel and Sage 100.
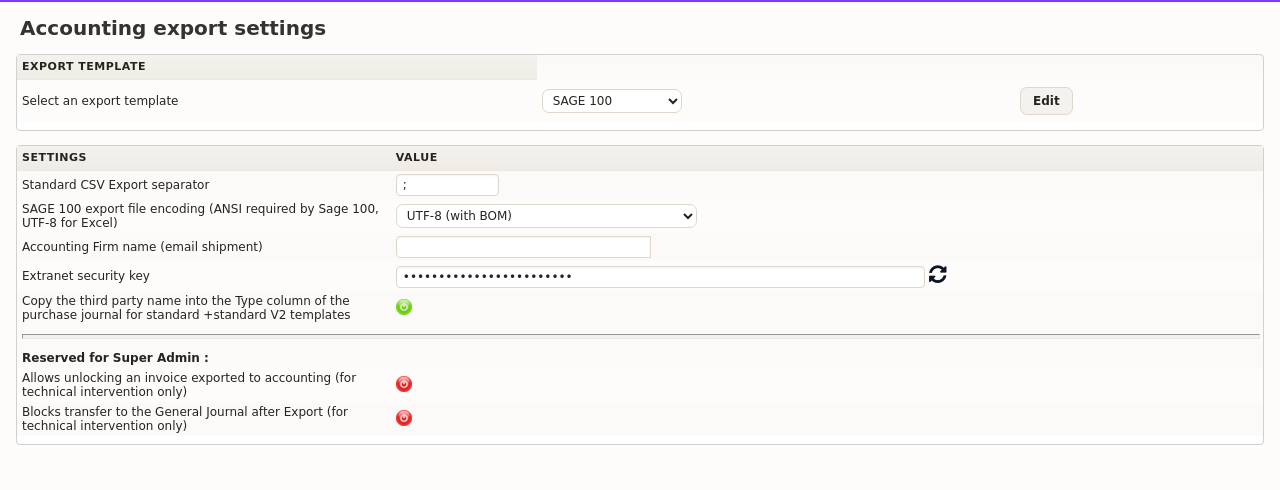
Other formats remain possible on request. Moreover, a security key can add, on standard exports, a column linking back to the sales or purchase document through a secure extranet link.
Setting up your accounting codes
To export accounting entries accurately, fill in your accounting codes on the relevant records: customers and suppliers, products, services, VAT accounts and bank accounts.
Moreover, the settings accept default codes, used whenever a record specifies none. You can also enable automatic allocation based on the accounting code of the product or service, on both the sales and the purchase side.
Entering or importing the chart of accounts
First, select the type of chart of accounts in the module settings. Then open the chart of accounts from the left menu: a matrix is available for download.
From there, you can:
- add accounts and sub-accounts, one by one or through a CSV import;
- synchronise the chart with the codes already entered on your product records.
Finally, the module settings stay reachable straight from the Accounting menu.
Adding accounting codes to your records
Open a product, service or third-party record, then fill in the accounting code field. There you state the account tied to the product, for purchases as well as sales, together with the account assigned to your customer or supplier.
Moreover, third parties can receive an accounting code assigned automatically: that behaviour is set in the third-party module settings.
Setting the VAT accounts
Next, open the VAT rate dictionary. For each rate, you define the account linked to sales and the account linked to purchases.
Moreover, the VAT table lists every VAT value used across the application: it serves as a check before an export.
Finally, the module settings accept a default VAT accounting code, used whenever the dictionary specifies none.
Entering the accounting code of your bank accounts
To export your receipts and payments together with the matching bank entries, open the Banks menu, then click “Edit” on one of your accounts.
Enter the accounting number tied to that bank account and save. From then on, the information is carried into every following export.
Allocating invoice lines to accounts
Standard allocation
Automatic allocation starts from the accounting code entered on the product or service record, looks for the match in the chart of accounts, then assigns the account it finds.
Lines without a match are not lost, however. You find them again in:
- Customer allocation / To do for sales invoices;
- Supplier allocation / To do for purchase invoices.
Moreover, you can set up suspense accounts to postpone those assignments in your books.
Automatic allocation by geographic zone and VAT rate
DoliPlus can also allocate to a different sub-account depending on the customer country and the VAT rate applied. Your domestic, EU and export sales therefore split on their own, rate by rate, with no extra data entry.
First, describe the product with a four-digit accounting code — for example 7061, that is the three digits of the main sub-account followed by a digit of your choice. Then, in the chart of accounts, enable the “Auto VAT allocation” column: only four-digit codes are eligible.
At allocation time, the program works out two things:
- the geographic zone, from the company country, on sales as on purchases: 1 for the EU, 2 for the home country, 3 for export;
- the VAT rate applied to the line.
The account is then completed as follows: 4 digits + 1 zone digit + 3 rate digits, without a decimal separator.
The same principle applies to class 6 expense accounts on the purchase side.
Exporting the journals
Reading the sales journal
You export accounting entries from two screens, and the sales journal is the first one. Open it from Accounting → Journals → Sales journal. It lists every allocated customer invoice line as debit / credit pairs: the customer account, the sales account and the VAT account.
A start-date and end-date filter narrows the display to a month, a quarter or a financial year. The table then shows eight columns:
- Date and Label: the date and the reference of the invoice;
- Account number: third-party account, allocated sales account or VAT account, depending on the line;
- Type: the account label, or the third-party name;
- D and C: the debit and credit amounts;
- Third party and Export: the customer, and the export date if the invoice has already gone.
Two conditions govern which entries appear. First, every invoice line must be allocated to an account. Then the accounting setup must be complete: sales journal code, VAT accounts and granted discount account. Whenever lines remain unallocated over the period, the screen tells you and offers to rebuild the allocation.
The Export to accounting button produces the file to pick up in your accounting software. Exported invoices then receive their export date and leave the current view; the Show transferred entries button brings them back on screen. Finally, on a large database, prefer Large export: the job runs in the background through the Cron module, therefore without any risk of interruption.
Reading the purchase journal
The purchase journal is the supplier counterpart of the previous one. It opens from Accounting → Journals → Purchase journal and lists the allocated supplier invoice lines: supplier account, expense accounts and deductible VAT.
By default, only invoices that are not exported yet appear. The period filter works exactly as on the sales side.
One point deserves your attention: the supplier accounting code must appear on the third-party record. Failing that, DoliPlus falls back on the default third-party account, which makes reconciliation harder for your bookkeeper.
Moreover, an option in the settings shows the supplier name in the Type column instead of the account label. It applies to the Standard and Standard V2 templates, and it helps you proofread before sending. Discounts obtained, meanwhile, are posted to their dedicated account.
Exporting the entries
Two modes are available to you:
- an export by date;
- an export by untransferred entries, which is preferable in most cases.
The choice is set through the option “For journals, give priority to untransferred entries” in the module settings.
Once transferred, entries are posted to the general ledger with an export number. The generated journal is filed in the document management module, in the format you chose. From there, a right click on the folder compresses it as a Zip file before sending.
You can also enter your accounting firm in the Export tab of the settings — option “Accounting firm name (email shipment)”: a button then emails the generated journals.
Finally, the card payment bank journal groups entries by date, which makes later reconciliation easier.
Attaching the accounting documents
The Quadra Compta template attaches customer and supplier invoices to the file and to the export folder.
The Standard V2 template, for its part, carries a secure link to the invoice in one column of the file. To use it, enable the extranet security key in the Export tab of the settings.
Exporting the third-party accounts
Third-party accounts are exported to your accounting software as well, from the Settings / Third-party accounts menu.
Bulk-updating third-party accounting codes
Manual method
In the Tools / Export assistant menu, pick query 9303 in CSV format, for customers or for suppliers. Then edit the content of the CODE_COMPTA column, and feed the file back through the Import assistant, query 10010.
Automatic method
This method regenerates the codes of every third party by applying the numbering module you configured. It opens from Accounting → Tools, a screen reserved for administrators.
Three checkboxes drive the job. You tick the ones that concern you:
- Customer and supplier codes: the commercial identification codes;
- Customer accounting codes: the customer third-party account used in the journals;
- Supplier accounting codes: its purchase-side counterpart.
Each box comes with a second option, “Delete … before update”. That one empties the existing codes first, then recalculates them all. Without it, DoliPlus simply fills in what is missing.
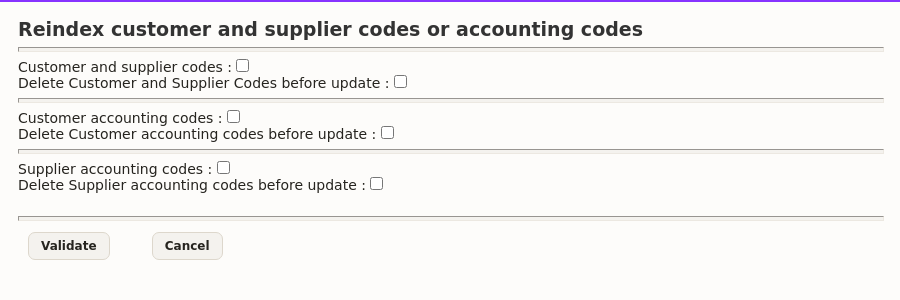
The job then runs in the background through the Cron module. A message confirms the launch, and you follow its progress in Home → Scheduled jobs. A database holding several thousand third parties therefore renumbers itself without freezing your screen.
This method helps in three situations: migrating data from another system, changing the numbering convention of third-party accounts, and setting up accounting for the first time on records created without a code.
Initialising the exports
When you start to export accounting entries late in the life of a database, it often helps to treat the entries of previous years as already exported. A tool in the Export tab answers that need.
Worked examples
Accounting for a customer down payment
The operation runs in four steps, shown here with French chart-of-accounts numbers:
- on receipt of the payment, you debit 512 “Bank” and credit 4191 “Customers – advances and down payments received on orders”;
- on the final sales invoice, you debit 411 “Customers” and credit the relevant class 7 account together with 44571 “Output VAT”;
- on the transfer of the down payment to the customer account, you debit 4191 and credit 411;
- on the final settlement, net of the down payment, you debit 512 and credit 411.
On the tax side, when the down payment covers a service whose VAT falls due on receipts — and unless you opted for taxation on debits — receiving the funds makes the VAT due, therefore payable to the tax authority.
In DoliPlus
First, see the down payment invoice, for the single-line down payment invoice.
Then configure the chart of accounts, optionally with the automatic allocation by geographic zone and VAT rate described above. Create a down payment service with a four-digit root, then build a single-line invoice from that service.
Accounting for a supplier down payment
The pattern mirrors the previous one:
- when recording the down payment made, you debit 4091 “Suppliers – advances and down payments paid on orders” and credit 512 “Bank”;
- on the final purchase invoice, you debit the relevant class 6 account and 4456 “Input VAT”, then credit 4011 “Suppliers”;
- on the transfer of the down payment to the supplier account, you debit 4011 and credit 4091;
- on the settlement of the balance, you debit 4011 and credit 512, which clears the supplier account.
In DoliPlus
See the “Down payment invoice on a supplier order” chapter of the supplier invoice.
Going further
- The income statement
- Cost accounting
- The VAT report by third party
- Gross total calculation and VAT rounding
Related Entrées
