 on 5 September 2026
 Equipment rental management with DoliPlus
Equipment rental management in DoliPlus
DoliPlus’ equipment rental management covers all processes for rental businesses, both short and long term. Specifically, you manage:
- Quotes including insurance, tax, eco contribution,
- Discount management for professionals or individuals,
- Special customer pricing,
- Automatic price adjustments based on quantity,
- Simple and recurring rental invoicing,
- Immediate or end-of-month invoicing,
- Payment management,
- Daily/weekly/monthly equipment scheduling,
- Rental forecast planning,
- Weather-related downtime management,
- Fleet management: maintenance tracking,
- Equipment monitoring records,
- Maintenance history,
- Issue and return document generation; plus, the DoliPlusMobi mobile app handles your rental check-in/out forms on tablet or smartphone,
- Statistics,
- Accounting integration,
- …,
Additionally, DoliPlus complies with AFNOR NF 525 standard for cash register software.
An online demo is available to test the application, or better yet book an appointment for a guided demo: click here then select Equipment rental
Resources – Equipment
Resources define the equipment you offer for rental.
Registering resources
First open the Rental/New resource menu. On the first screen, enter the resource name and its group.
Then complete the record by editing it.
Adjust the resource colour, rental duration, description, notes, etc.
For equipment photos, upload them to the document library/resource photos.
- Create rental services with their associated pricing, based on potential customer segments (INDIVIDUALS, TRADESMEN/PROFESSIONALS, BUSINESSES/KEY ACCOUNTS), then link this service to the resource via the permanent Product/service link,
- Link customers to pricing from their record,
- Define categories that group similar resources via the Rental/Group menu,
- Also define categories that segment resources via the Rental/Category menu,
- Finally, add custom fields per group if needed to qualify the resource more precisely. Use the shortcut directly from the resource record,
Once setup is complete, validate the record: the resource then becomes available for rental.
You can view the resource list via the Rental/List menu. The “Group” filter refreshes the list and displays custom field columns (activate columns as needed).
Resources & barcodes
To easily identify your equipment, enable the “Enable barcode management” option.

A new tab will then appear within the resource:
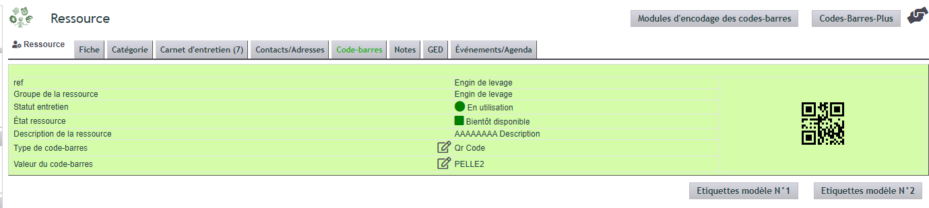
Depending on your configuration, DoliPlus offers different encoding types. Here, for example, we’ve selected “QR code”.
Additionally, you can print a label in various formats based on your settings.
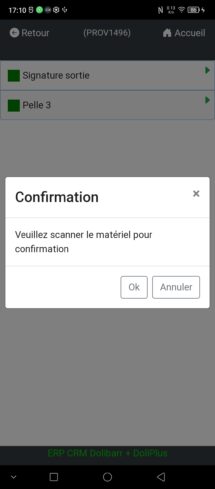
The other option, “Enable resource/equipment verification before mobile form submission”, ensures that outgoing or returned equipment matches the schedule.
As an added feature, a forced mode allows you to correct the resource and reassign it to the current entry.
Faulty Resources
If a resource breaks down, set its status to “For repair”. It remains visible in the schedule with a cross indicating its unavailability.
Resource Maintenance
A maintenance log is available in the resource under the Resource/Maintenance tab.
During initial setup, first configure the form using the custom fields in the maintenance log.
Then add maintenance tasks to be scheduled or performed.
Finally, associate the Excel template document in the folder: Tools Menu -> Documents & Templates -> Document Templates -> Equipment Maintenance.
Create a Quote
First create a proposal from the customer or supplier as usual.
When you select a rental service, DoliPlus automatically inserts a schedule and suggests resources from the corresponding group.
Select a resource, then the provisional dates. Adjust the rate if needed, then add the line.
The insurance service is automatically added to the quote; its amount is calculated based on all rental services included.
You set the insurance rate in the module configuration, as well as in the customer or supplier record if they have a negotiated rate or external coverage.
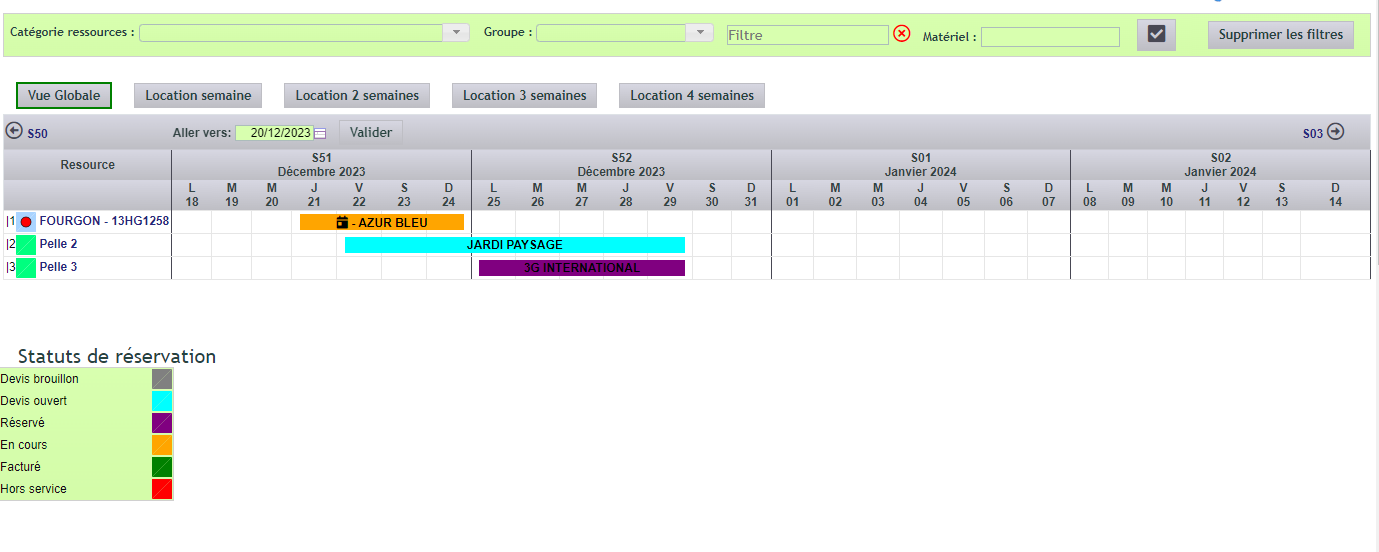
Selected resources then appear in the rental schedule, colour-coded to indicate confirmed or tentative bookings. The colour code legend is shown at the bottom of the page.
Create an Express Quote
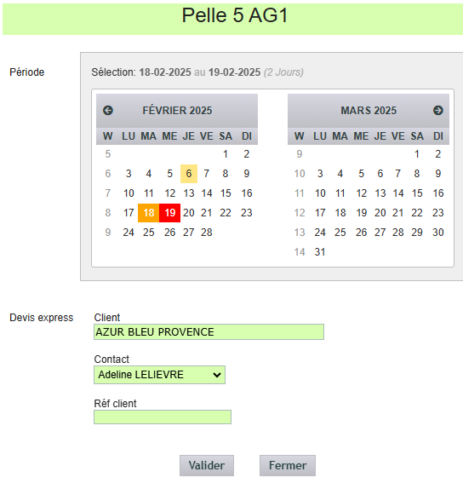
From the main equipment rental table, click on any item line: a dialog box will open.
Select the period, customer/supplier and a contact.
If needed, select another resource, then add it to the current quote.
Confirm Booking
Once the quote is prepared, regular customers can confirm their booking without a deposit step.
The quote must be in “Validated” status. Then click the “Confirm Booking” button. To cancel, click “Cancel Booking” instead.
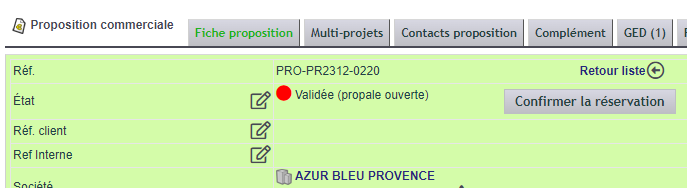
A shortcut remains available with one click on the quote in the bookings table.
Confirm Quote – Issue a Deposit
Upon customer agreement, close the quote with “Signed” status.
DoliPlus then automatically creates a provisional invoice linked to the confirmed booking.
To take a deposit, return to the quote from the created invoice (at the bottom of the page). Then use the “Create Invoice or Credit Note” button to generate a single-line deposit invoice for the required amount. This deposit will be credited against the final invoice.
Dashboard
A dashboard provides access to statistics, including:
- Recently modified maintenance logs,
- Recently modified rental quotes,
- List of overdue returns,
Proforma Invoice
First, enable option PG21: “Enable Proforma Invoices” in the Configuration Area – General Settings.
Then, from the quote, the Proforma button generates a Proforma invoice.
Non-billing Days
First, in configuration, associate a service corresponding to non-billing days.
To suspend billing, declare non-billing days from the main schedule, for ongoing rentals (provisional billing).
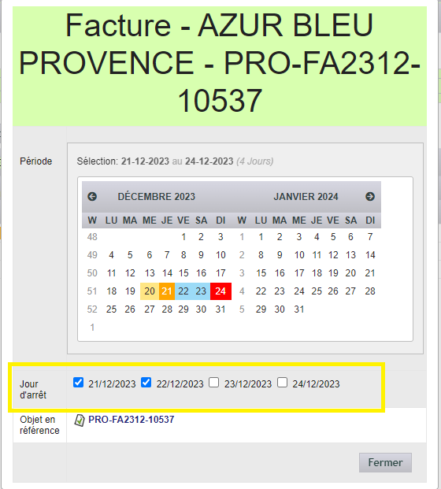
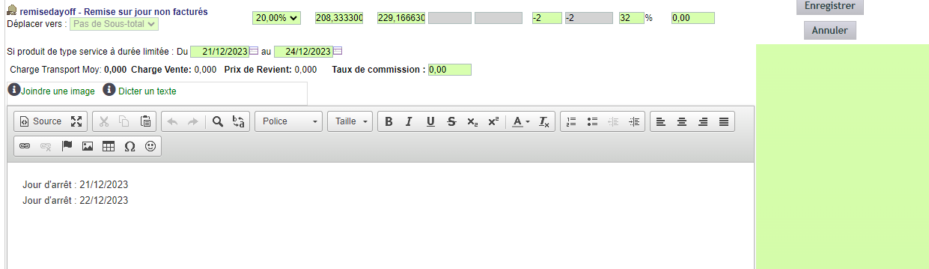
Finally, when validating the invoice, DoliPlus uses the “discount for non-billed days” service defined in configuration to add discount details.
Billing
You have several billing methods:
- Standard billing,
- Recurring billing for long-term rentals: create a recurring invoice, then assign equipment,
- End-of-month billing: group provisional invoices using the tools in the customer’s invoice list.
Here’s an example of provisional invoice grouping:
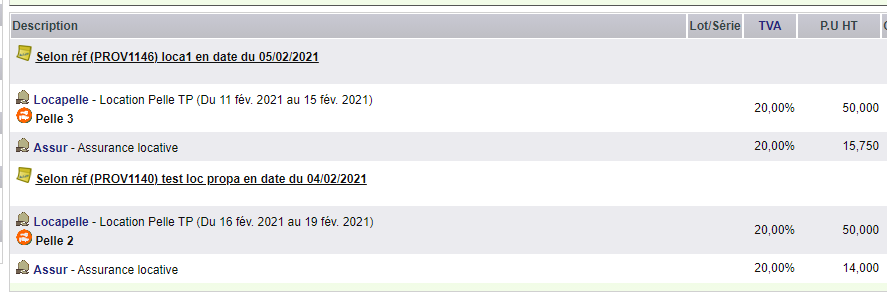
Note: during consolidation, DoliPlus also migrates document library files, resources and forms.
Resource Schedule
Colour coding lets you view booking status:
- Grey: unconfirmed booking,
- Orange: confirmed booking, a provisional invoice is issued,
- Red: invoiced booking.
Resources appear in left-hand columns with their colour code. An active link opens the resource record, while a cross indicates its out-of-service status.
The weekly view can be configured for 4 or 5 weeks, and period navigation displays your chosen timeframe.
When you click on a booking date, a window opens allowing you to:
- Modify the booking period; the price is then recalculated,
- View the booking status,
- Set non-billing days,
- Assign or open the linked object (sales proposal or invoice),
- Assign or open the customer record.
For quick access to resources, also use category, group and category name filters.
To modify booking dates, you have several options. First, drag and drop directly from the rental table. Alternatively, click the booking in this same table, then modify dates. Finally, from the dashboard, for unreturned rentals, click the “Plus” icon to add rental days.
In all cases, DoliPlus recalculates the price and associated services (insurance, eco contribution), applying any relevant business rules.
Equipment Check-out and Return Forms
Forms
Go to Rental/Group/Check-in-check-out Forms tab.
- You can define customisable forms per group using custom fields,
- You can also share these form elements between multiple groups,
- An example is provided when installing the module,
Forms then become accessible from the invoice tab.
In Web app mode, two tabs allow signing check-out and return forms. A specific interface also exists in mobile mode.
Document Generation
Go to the module configuration, Location/settings/location, “Document Management” tab.
- Enable the document and its editing mode (PDF/Excel).
- Download the Excel template, then adapt it to the group form using the module’s specific tags/variables.
- Upload each group’s documents to the document library: Tools Menu -> Documents & Matrices -> Document Templates -> Equipment Rental.
- Finally, link the documents to the group: match each group with the corresponding document name. One document can be used for multiple groups if needed.
Documents generated from the forms are then filed in a subfolder of the invoice document library.
Tags used for document editing
First, take the provided example template and open it.
Tags are placed in the document cells; they will be replaced by the form values.
Here are the three tag families *:
Tag resource, {resource-XXX}
- asset: grouping of three variables, the group name + ref + internal ref
- ref: the asset reference
- asset_number: the internal reference of the asset
Tag invoice, {invoice-XXX}
- ref: invoice reference
- client: the customer name
Tag location, {location-XXX}
- All attributes defined in custom fields
* Non-exhaustive list, for any other need contact your support.
Agent signatures
Go to the HR module, then upload a signature for each agent.
Service record file forms
Forms
Go to Location/Group/Maintenance Forms tab.
- You define customisable forms per group, using custom fields,
- These form elements belong to the INS group,
- An example is provided upon module installation,
The forms then become accessible from the invoice tab. A specific interface is also available in mobile mode.
Document editing
Go to the module configuration, Location/settings/location, “Document Management” tab.
- Enable the document and its editing mode (PDF/Excel).
- Download the Excel template, then adapt it to the group form using the module’s specific tags/variables.
- Upload each group’s documents to the document library: Tools Menu -> Documents & Matrices -> Document Templates -> Equipment Rental.
- Finally, link the documents to the group: match each group with the corresponding document name. One document can be used for multiple groups if needed.
Documents generated from the forms are then filed under the form.
First, take the provided example template and open it.
Tags are placed in the document cells; they will be replaced by the form values.
Here are the two tag families used *:
Tag Asset: {Asset-XXX}
- Used to display the asset’s custom fields
- XXX represents the custom field code
Tag Maintenance: {Maintenance-XXX}
- Used to display the maintenance record’s custom fields
- XXX represents the custom field code
- XXX has two additional tags: ref for the maintenance record number and datec for the record creation date
Two special tags are also used, with their implementation in table mode shown below:
- Task list with quantity
- List of consumed parts with quantity and comment
| Ref | {Entretien-ref} | ||||
| CUSTOMER NAME | {Entretien-client} | AGENCY | {Entretien-agence} | ||
| BRAND | {Materiel-marque} | REGISTRATION | {Materiel-immatriculation} | DATE | {Entretien-datec} |
| VIN / SERIAL NUMBER | {Materiel-serie} | ||||
| MILEAGE | {Entretien-km} | TECHNICIAN | {Entretien-technicien} | ||
| HOURS | {Entretien-horametre} | ||||
| WORK DESCRIPTION | QUANTITY (Hours) | ||||
| [!– TASK row.lines –] {Entretien-label} | {Entretien-qty} | ||||
| [!– END_TASK row.lines –] | |||||
| TOTAL LABOUR COST | {Entretien-total_task} | ||||
| PART/SPARE REFERENCE | Comment | QUANTITY | |||
| [!– PRODUCT row.lines –] {Entretien-label} | {Entretien-comment} | {Entretien-qty} | |||
| [!– END_PRODUCT row.lines –] | |||||
| TOTAL PARTS COST | {Entretien-total_product} | ||||
Rental module configuration
Accessible to the administrator from the module menu -> Settings / Rental, this interface allows you to modify the configuration parameters.
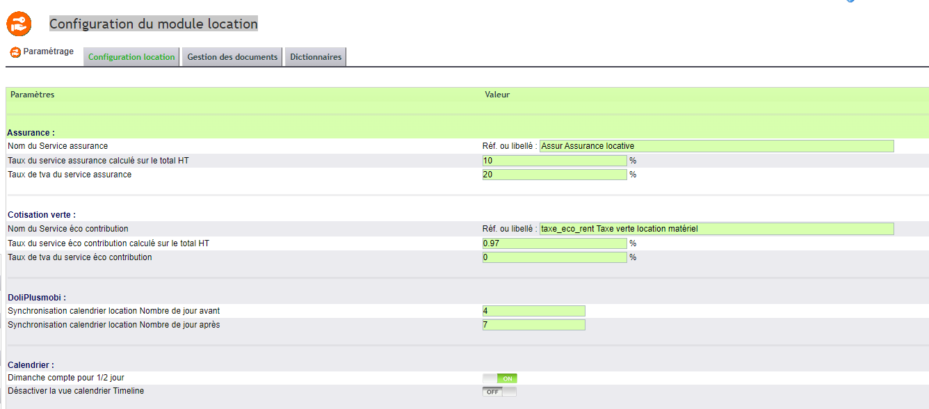
- Associate in configuration a service corresponding to the billing of insurance.
- Similarly, associate a service corresponding to the billing of the eco-contribution.
- Finally, associate a service corresponding to the billing of downtime days.
Material in/out entry interface – DoliPlusMobi – Mobile app
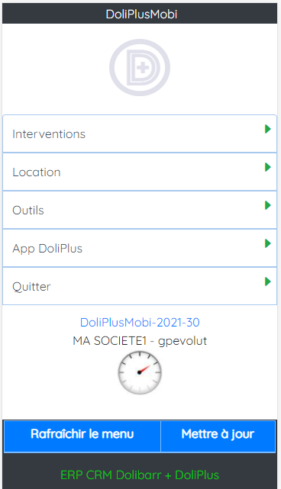
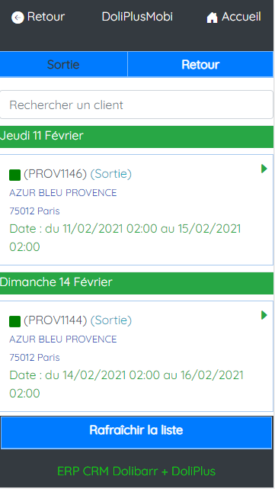
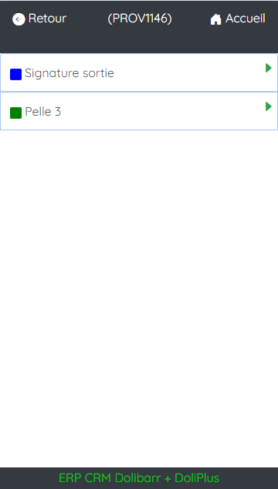
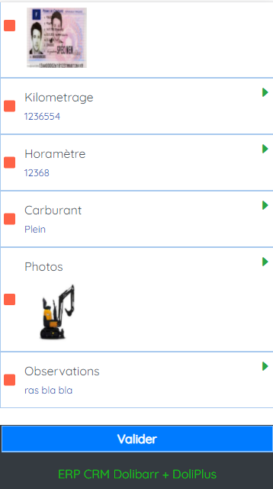
The mobile app DoliPlusMobi allows you to record material inspections on entry and exit.
It works even in offline mode (no network). Additionally, the document is automatically generated upon validation, including signatures.
Module configuration
Go to the module configuration: Location/settings/location. You will find the following tabs:
- Location setup: define the insurance service name, rate, VAT, etc.
- Document management: configure document printing settings,
- Dictionaries: access various dictionaries
- Resource groups,
- Resource maintenance statuses,
- Custom resource fields,
- Custom input/output form fields.
Next, go to Location/settings/resource. You will find:
- Resource module setup: adjust scheduling display settings,
- Dictionaries: same as above.
Finally, go to the commercial proposal module configuration and set up automated workflows (workflow) from quote to invoice.
Don’t forget to enable, in Settings/interface, option PG63: “Enable date management for services”.
Further reading
- Financial Proposals — rental financial proposals.
