 on 7 July 2026
Why choose a CRM with integrated email?
DoliPlus is a CRM with integrated email, so your messages and your business management live in a single interface:
- automatic sign-in: your DoliPlus session opens the webmail, no password to retype;
- email writing assisted by artificial intelligence, with built-in spelling correction;
- a direct link with the DoliPlus document manager for incoming and outgoing attachments;
- an address book kept in sync with your DoliPlus contacts;
- anti-spam filtering, out-of-office replies, folders, colour tags and message templates.
As a result, you handle your messages without leaving your ERP, from a computer as well as from a smartphone. DoliPlus is the enhanced cloud edition of Dolibarr, the open-source ERP & CRM used across Europe.
The built-in mailbox is dressed in the DoliPlus colours and its interface is responsive: it adapts to smartphone and tablet screens.
Managing your business email inside DoliPlus
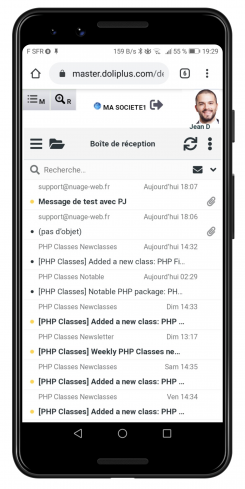
Here is what this CRM with integrated email brings you every day:
- an open DoliPlus session gives access to your mailbox through the Email menu, from a PC, Mac, tablet or smartphone;
- automatic sign-in: from DoliPlus, you enter the webmail without retyping your password (your DoliPlus session identifies you);
- email writing assisted by artificial intelligence, with built-in spelling correction;
- the ability to manage several mailboxes, whatever the email provider;
- a link with the DoliPlus document manager for incoming and outgoing attachments;
- an address book synchronised with your DoliPlus contacts;
- a library of ready-made messages;
- anti-spam filtering;
- out-of-office and holiday replies;
- colour tags on messages, by source or by sender;
- automatic filing rules;
- desktop notification of incoming messages;
- folders to sort your messages by topic;
- a personalised signature;
- archiving of outgoing mail with the DoliPlus fax/mail archive module;
- the option to register the webmail in your browser, so every email link on a web page opens in this interface.
Setting up your email accounts
First of all, your email account must be configured in the DoliPlus email module.
For this step, please read the chapter Configuring email in DoliPlus.
The inbox
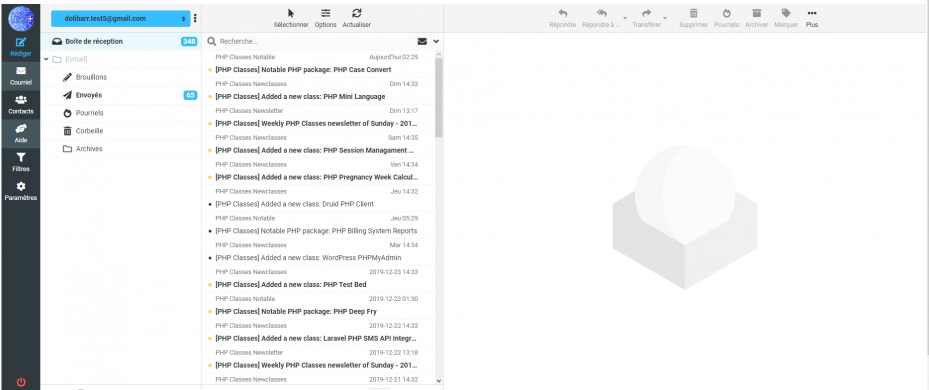
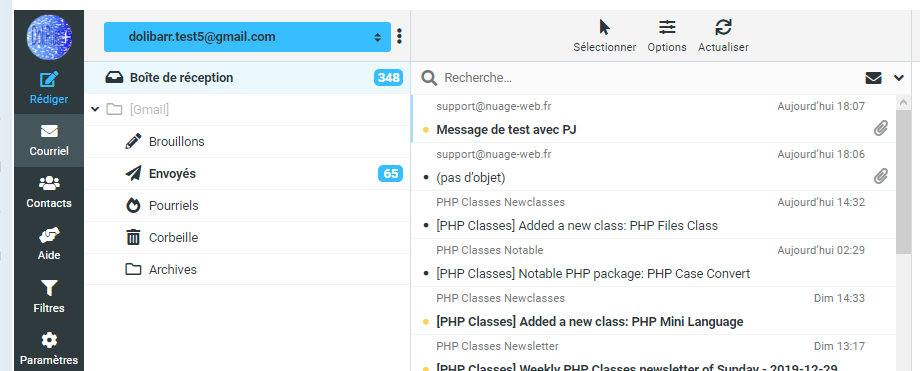
In the left-hand column, you find the main folders of your email account, with received and sent messages.
On the right-hand side, you can view all the emails you have received.
Display and sorting options
To reach these options, click the icon at the top of the main toolbar, as shown in the screenshot.
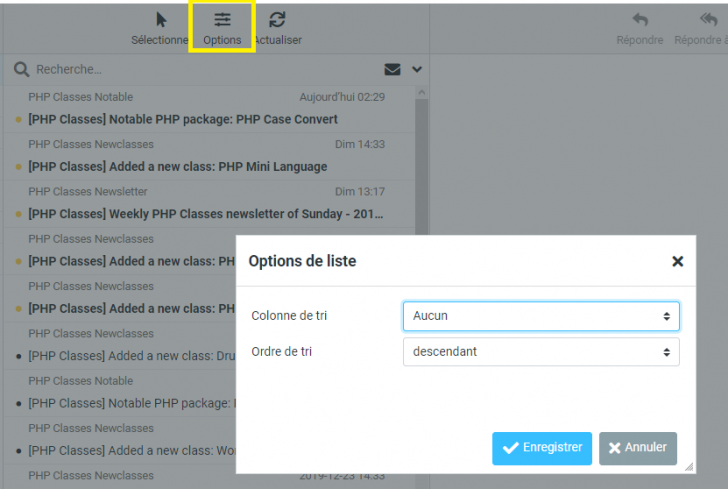
Once you have made your selection, confirm by clicking “Save”.
Reading messages
The mailbox handles the main email options: read receipts, flags, attachments and privacy protection.
Moreover, the screenshot below gives you an overview of all these features.
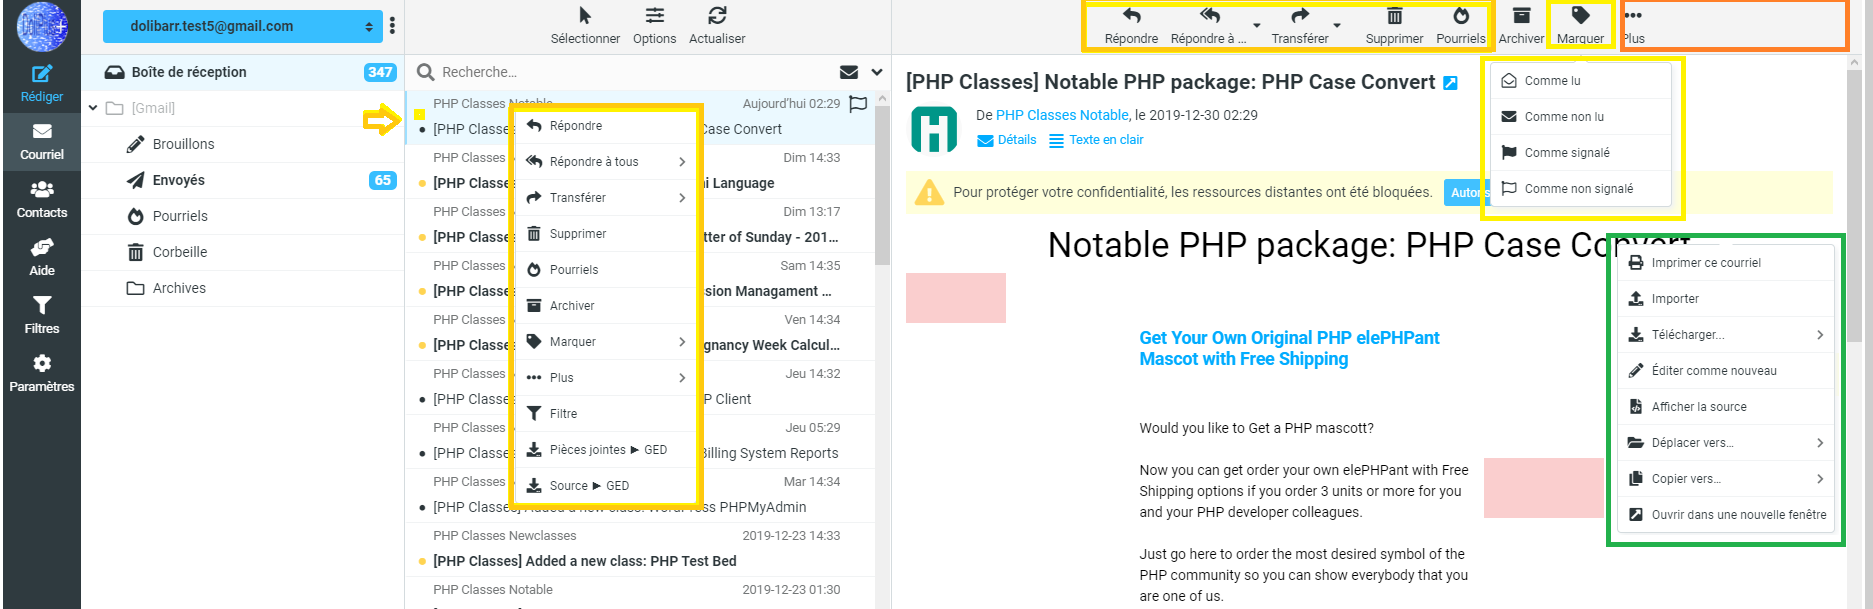
The number of unread emails appears in a small badge in the left column, next to the inbox.
In addition, an unread email appears in bold in the right-hand part.
For each message, either from the top toolbar or with a right click on the message, a context menu offers the following options:
- Reply: answer the sender directly;
- Reply to all: answer everyone present in the “To” and “Copy” fields;
- Forward: send the selected email to the recipients of your choice;
- Delete: move the selected email to the “Trash”;
- Junk: move the selected email straight to the junk folder and mark it as spam;
- Flag a message;
- More: a window gives access to further options.
-
- Print this message: opens the message in a new window and offers to print it;
- Download: saves the email on your computer as a standard message file;
- Edit as new message: reuse an email while keeping its original layout;
- View source: shows the complete source of the message — very useful when someone asks you for a header;
- Open in a new window: handy for reading several messages at the same time.
Writing a new message
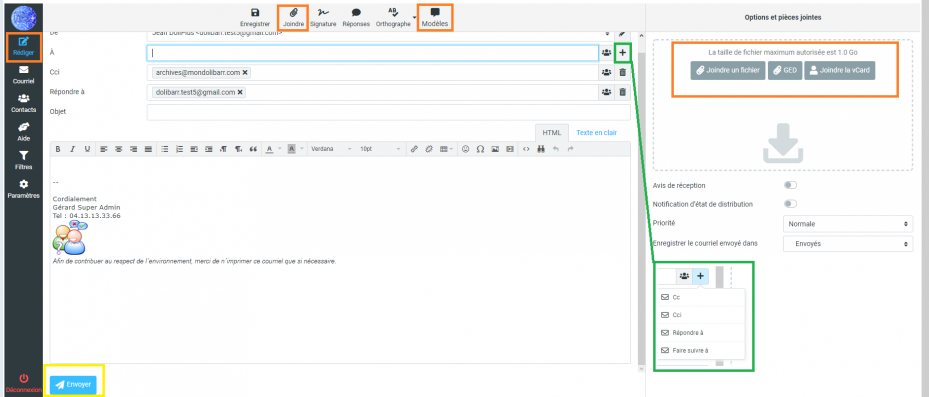
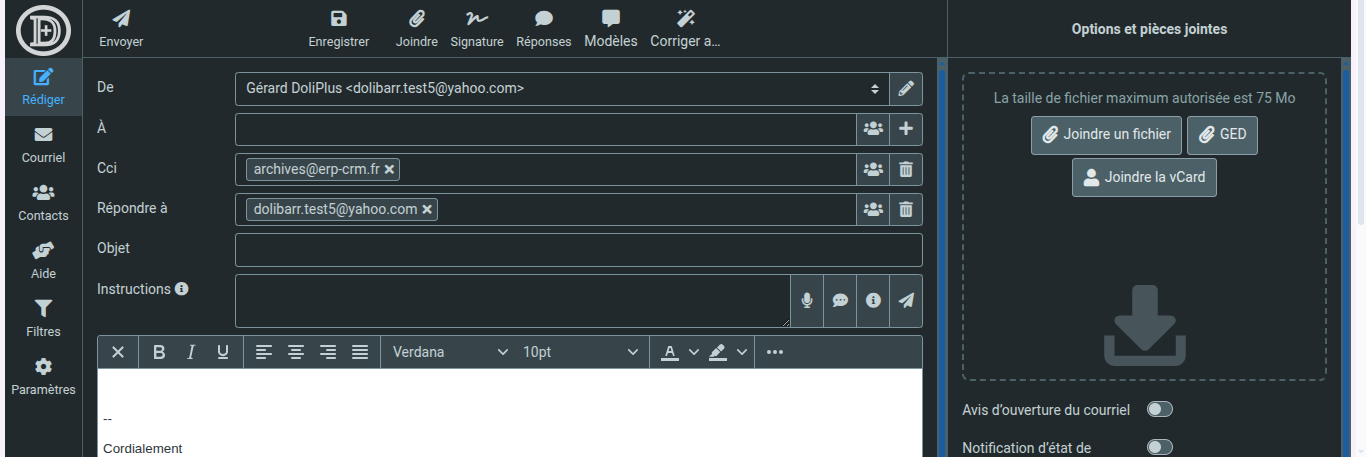
To write a new message, click “Compose”.
Recipients
Search your saved correspondents by clicking the type of copy you want to give them:
- To: add your correspondent as a direct recipient;
- +: add your correspondent in simple copy;
- Bcc: add your correspondent in hidden copy. The other recipients of the email will not see them.
Using the message library
A “Templates” button inserts content from ready-made models (Tools / Email templates…). The content lands at the cursor position in the message window.
For example, see the DoliPlus libraries of messages and standard texts.
Adding an attachment to a message — the DoliPlus document manager
- To attach one or more digital documents (PDF, office file, image…) while writing your message, simply click “Attach” at the top of the toolbar (the paperclip button).
- Alternatively, drag and drop the files from your computer onto the area provided next to the “Attach a file” button; in this case, the maximum size for one attached file is 1 GB.
- Finally, through the DoliPlus document manager: click the upper GED DoliPlus button. The explorer opens and lets you pick the document.
Deleting a message
Through the trash
Drag the message to the trash, or use the context menu.
Without going through the trash
This is useful when the mailbox is full: press Shift + Delete on your keyboard. However, be careful with this shortcut…
Extracting the attachments of a message into the document manager
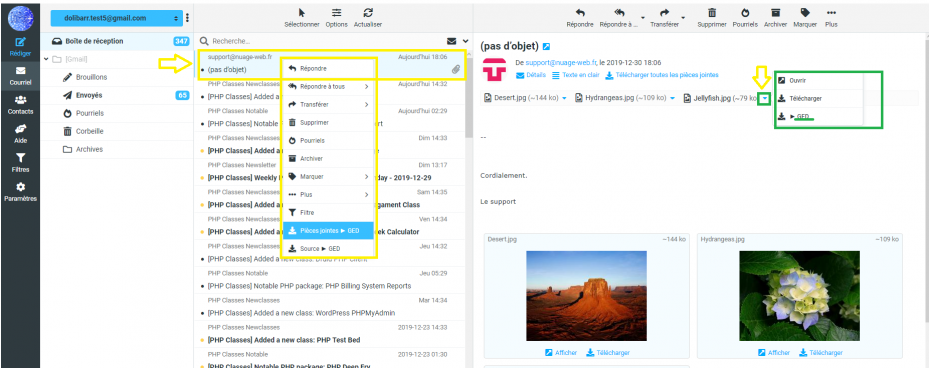
From the list, select the message containing one or more attachments. The line itself must be selected.
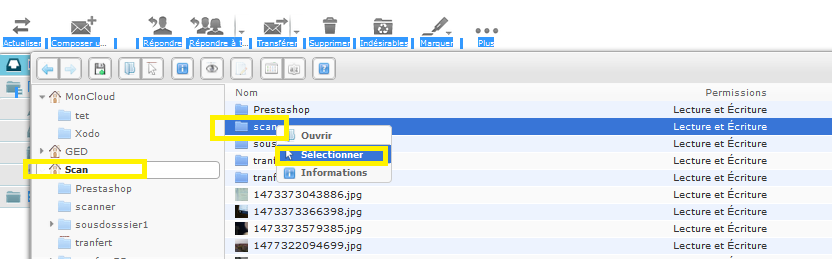
Once the explorer is open, you then need to choose a destination folder.
In general, the “Scan” or “Moncloud” folder is used as a transfer folder.
The next action then redirects the content of “Scan” to the document space of a supplier invoice or of a third party, directly from your DoliPlus.
Finally, a confirmation message appears at the top of the screen.

Adding an emailed event invitation to the calendar
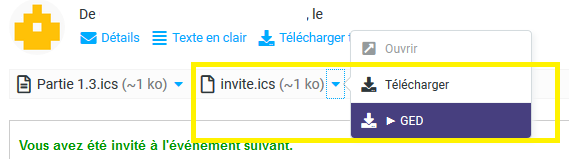
To add an invitation received by email to your calendar, download the standard calendar file — “invite.ics” in this example — to the document manager, as explained in the previous chapter. The event is then also added to your calendar.
Searching for a message
To search for a message in a folder, use the magnifying glass and its entry field.
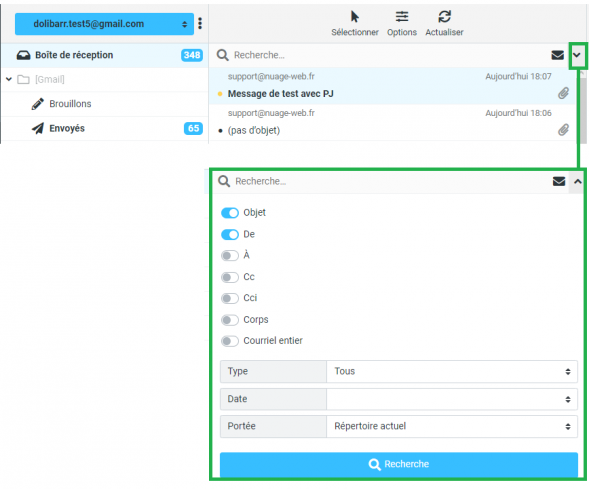
A click on the arrow opens the full search box.
Please note: the search runs on the remote mail server, not locally.
Therefore, depending on the size of the folder, it may help to refine the search to avoid an endless wait.
The address book
Your CRM contacts, synchronised
In “Contacts”, you can choose the default address book (if several address books exist), as well as the sorting and display options for contacts.
The “DoliPlus” book is the read-only book synchronised with DoliPlus. Moreover, it refreshes automatically whenever your DoliPlus contacts change.
The automatically collected address book gathers the addresses collected from your outgoing messages.
Sending a message to a group
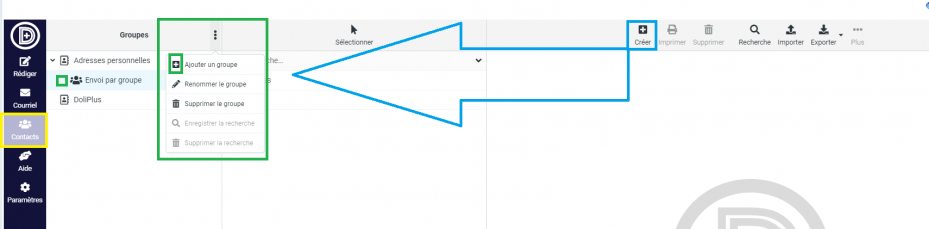
How do you send one message to a whole set of recipients?
- First, create a group, then add your correspondents to it.
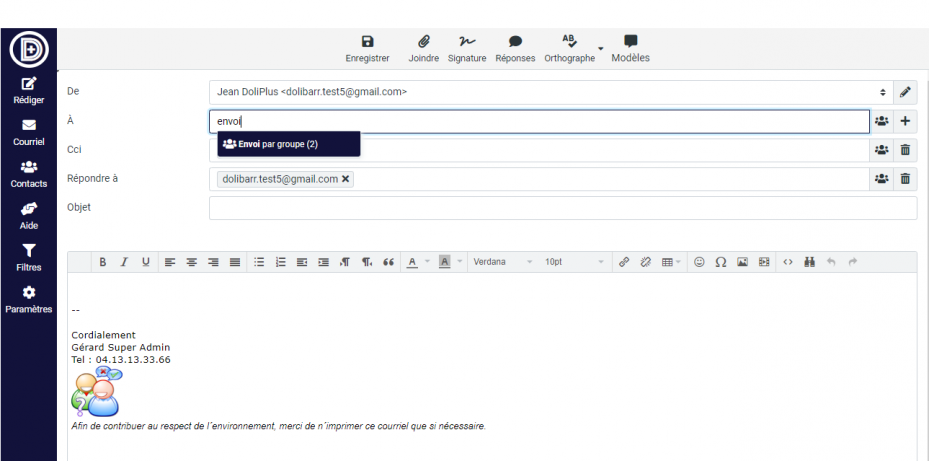
- Then, while writing the email, simply type the name of the group.
User interface settings
After clicking the gear icon, you land directly on the user interface settings.
In this screen, you can change several elements, such as the language and the date and time formats.
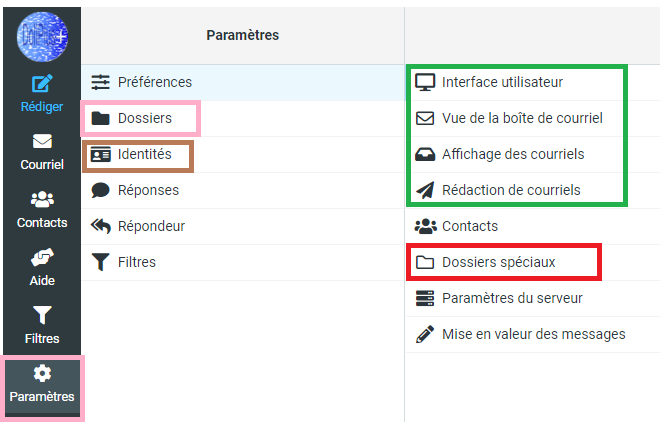
Mailbox view
Here, you can change the number of emails shown on screen — for example to get fewer pages if you have a large number of emails.
You can also decide not to show the preview of the selected email in the first screen, and view it only on a double click or in a new window.
Message display
In message display, you choose how your emails appear: rich layout or plain text, remote images, character encoding.
For the other available options, see the screenshot.
Writing messages
In message writing, you choose the different elements linked to composing your emails: writing format, read receipt, delivery notice, font, and so on.
For example, you can switch the format to “always” in order to send your emails with a rich layout.
Special folders (an important setting)
In special folders, you must define the mapping between the main folder names on your mail server and their role:
Drafts, Sent messages, Junk, and the emails that go to the Trash.
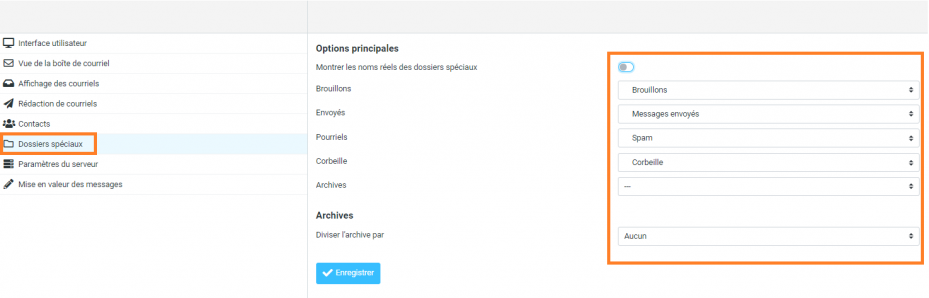
For creating custom folders, please refer to the Settings — Folders paragraph.
Server settings
In server settings, you configure everything related to deleting emails on the server (from the webmail).
For the other available options, see the screenshot.
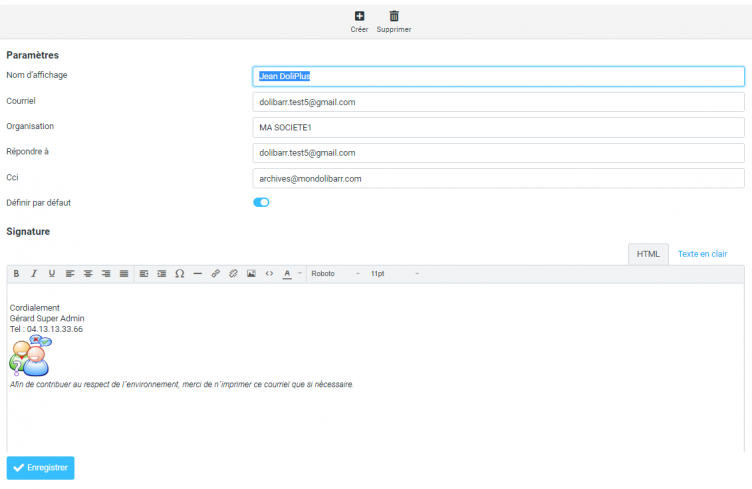
Identities — setting up a signature
To set up a signature that will appear in every email you send, go to Settings, then Identities — the email address you are connected with.
Please note: this step requires the image to be hosted in your public folder.
However, the simplest method is to synchronise the signature from your DoliPlus user card:
What you see is what you will get on the identity card.
Folders
Creating a folder
To create a custom folder — and thus isolate the messages of a specific topic or correspondent — click the “+”.
Editing or deleting a folder
Deleting a folder (beware of the emails it still contains) or editing it is just as simple.
To delete, select your folder, then click the gear at the bottom of the page. You can either delete the folder or empty it. You can also check the overall usage of your mailbox (as a percentage).
To edit a folder, simply click it. You can then change its name, its parent folder and its display type, and view the number of messages and the space they use. The “Click to get the folder size” link computes the size of these emails (as soon as the count is above 0).
Finally, the native folders — Inbox, Sent and Trash — cannot be modified, as you can see in the screenshot.
Highlighting certain messages
Note: after configuration, every email sent or received in your DoliPlus integrated email can benefit from the DoliPlus archiving.
Desktop notification of incoming messages
For Firefox, first install the HTML Desktop Notifications add-on: https://addons.mozilla.org/firefox/addon/html-notifications/
Then, in Preferences — plugin management, enable “New message notification”.
Finally, in Preferences — mailbox view, test “Show a desktop notification on new message”; if it works, tick the option and save.
Using the email links of your browser
To set your DoliPlus mailbox as the default email application, it is very simple: go to Preferences → User interface, enable “Register the handler for email links”, and accept the message (tested with Firefox).
For Chrome, accept the message as well; in case of trouble, see the Chrome help: http://support.google.com/chrome/bin/answer.py?hl=fr&answer=1382847
Managing other external email accounts
The management of additional accounts differs from the previous version. Passwords must be entered again after migration, because the encryption system has been strengthened and is not compatible with the new version.
From the Identities management, you can add extra identities with their account settings.
However, the settings of the main account identity cannot be modified.
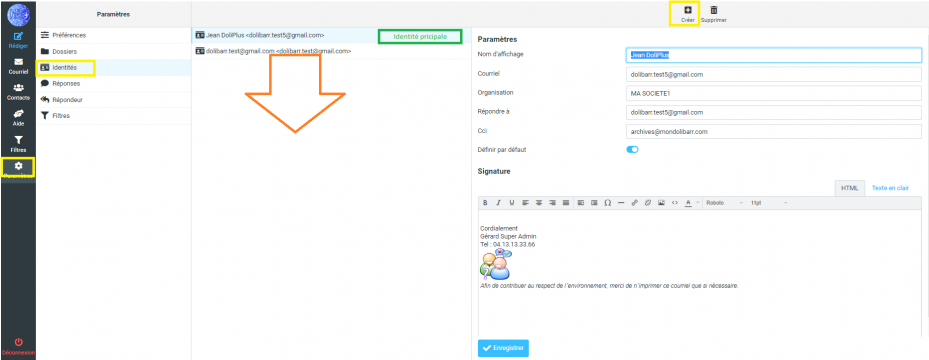
Use the “Create” button. Two groups of settings must then be completed: the account identity and the server access settings.
For the server access settings, preferably use the preset (when available) to fill in the technical values, then run the test: if the connection succeeds, the folder names appear in a window.
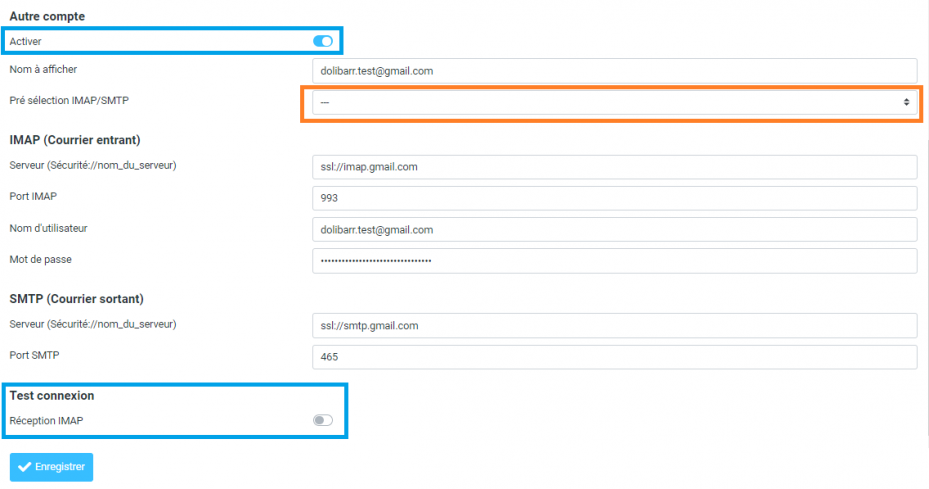
Once checked, go to “Mail” and switch to the new account with the selector.
Then go to the special folders configuration, see the chapter above.
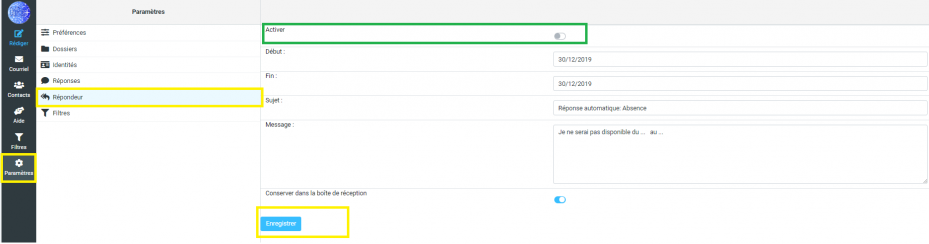
Out-of-office and holiday replies
The message collection service must be active on DoliPlus. Then follow the instructions below.
Artificial intelligence in your CRM with integrated email
While composing, a Generate button writes an email from a few instructions (tone, length, language): the generation relies on artificial intelligence. Moreover, a second Correct with AI button proofreads your text and fixes grammar and spelling without altering the layout. You can also save your own predefined instructions and reuse them.
Learn more…
Creating filtering and anti-spam rules
Learn more…
Sending email through DoliPlus — the internal email interface
Learn more…
Standard messages for emails
Learn more…
Related Entrées
